Miyumi
How To Make The Miyumi Body Form


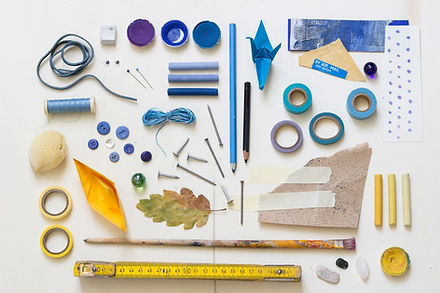
What You’ll Need
-
The Miyumi Body Form Pattern (click here to buy PDF in A4 or Letter Format)
-
Computer and printer (with lots of ink)
-
210gsm paper card (about 40 sheets)
-
Very sharp scissors
-
Sharp cutting blade
-
Cutting mat
-
Lots of ½” tape (12.5mm) … I used Scotch 3M brand tape in 1” that I cut lengthwise in half as my shop was out of stock of ½”.
-
Ruler
-
Several hours
This is not an easy project. It’s going to take skill, patience and a whole lot of time. You need to cut accurately down the center of the line and tape accurately. If you’re slightly out on your cutting then the length of the curves will change and the pattern pieces won’t line up. You’ll very quickly see if you’re out as I’ve added arrows .... these are your life line so use them … if they don’t match perfectly then it’s probably because you haven’t cut absolutely perfectly down the center of the line. I can’t stress this enough.
I don’t recommend using tape narrower than 3/8” (10mm) as it won’t have the bite to hold on to both sides of the join. Cheap tape will also lack the holding power you’ll need. Likewise tape wider than ½“ (12.5mm) can affect how the pattern pieces curve and also not sit flat. I like to use lots small bite sized lengths around 25mm to 30mm long each as they’re the most manageable on all the curves … you could use longer pieces on the long straighter sections.
The pattern includes all the pattern pieces you need to create the body form for a size 76cm underbust, 72cm waist, 95cm hips and 34.5cm nape to waist ... the bust size depends on which of the included breast forms you choose to use.
Once the dress form is assembled, it will be split at the waist with a special template and papier mache will be applied to the inside of the form. The completed hard form can then be sanded and lacquered, or even have a thin layer of foam applied.
This project takes time and skill and is recommended for experienced crafters only ...
Difficulty: very difficult
Skill level: advanced
Copyright Note: this pattern and it's instructions are intended for home use only. Using this pattern to produce dress forms or modifying it for resale or any other commercial use is strictly prohibited. It is intended for use as a pattern making or display aid. This pattern is not to be shared with others. One pattern is for use by one person. By purchasing this pattern you are agreeing to these copyright terms.
Step One
I found it was easier to start at the bottom and work my way up when assembling the body form, so I’ve numbered the pieces starting at the bottom to help direct you on what’s the easiest way to assemble the project. Of course you can change the order for whatever works best for you … this is just what worked for me. So I’m starting with the crotch as it’s impossible to get to once the outside sections are done.


Image 1
Image 2
Image 3
Image 4
Image 5
Cut out Pattern Pieces 1 through 4, both left and right sides (see image 1). These pieces were too long to print out on A4 in one piece so you’ll need to stick the top and bottom parts together ... each bottom part is labeled with the same number as its corresponding top part.
Line up both left and right sides of Pattern Piece 1 along center front and tape them together carefully lining up the arrows (see image 2). Repeat by adding Pattern Pieces 2 (left and right) to the center pieces (see image 3 & 4). Then join Pattern Pieces 3 (left and right) to form the tummy being careful to make sure all the arrows line up (see image 5).


Image 6
Image 7
Image 8
If you’ve done it correctly the ends should all be square as shown in Image 6. If they’re a fraction out (less than 0.5 millimeter) you should be ok ... just trim it the tiniest fraction to make it square… more than that and you might want to go back and re-tape as it can make the gusset section twist.
Take both left and right sides of Pattern Piece 4 and place little bits of tacking tape along the center line as shown in Image 7… this tends to hold it in place so you can curve edge easier before taping permanently. I put little bits of tape along the whole length right up to the end. Notice that when you get to the point the tips will cross over because the curve is changing direction yet again. Do not cut them off or try to bend them … simply follow the curve and join them together with a little bit of tape as I’ve shown below (see Image 8). Once it’s all tacked together you can run along the edge with longer tape … this is a technique I use when parts are difficult to hold … just make sure you use the arrows so you everything is the correct shape.


Image 9
Image 10
Image 11
Image 12
Your two sections should look like Image 9 ... so, join the gusset section to the tummy section you assembled before (see Image 10). I also taped the inside of this join for added strength as it does get pulled on quite a bit when the inside leg sections get fitted (see Image 11). And now you've completed Step 1 ... it should look like Image 12. Put this section to one side for now and we’ll assemble the next section.
Step Two
Cut out the left and right sides of Pattern Pieces 5 through 10 (see Image 13). Read the markings on Pattern Piece 5 carefully to see where each piece goes … four separate pieces join Pattern Piece 5 to create the start of the cheek at the rear of the gusset. This section will twist like crazy as you assemble it, but just make sure it’s all lined up with the arrows and everything will be OK.


Image 13
Image 14
Image 15
Image 16
Image 17
Join Pattern Piece 9 to Pattern Piece 5 and tape into position being careful to match the arrows (see Image 14) ... if you didn't cut the lines perfectly then you'll find each piece might not fit between the arrows properly ... check! Take Pattern Piece 8 and line it up with Pattern Piece 5 and tape into position (see Image 15). Repeat with Pattern Piece 7 (see Image 16). When you join Pattern Piece 7 with pattern piece 5 it will sit on top of the other pieces because of its shape (see Image 17) ... this is ok.


Image 18
Image 19
Image 20
Image 21
Now start joining each of the Pattern Pieces 6 through 9 to each other (see Images 18 to 21)… I found it easier to start at Pattern Piece 9. Pattern Piece 6 will need to be twisted into position so the arrows line up. I found it easier to tack them into place at the alignment marks first as it can flick out of place easily (see Image 20).


Image 22
Image 23
Image 24
Lastly add Pattern Piece 10 to the edge of Pattern Piece 9, going all the way across Pattern Piece 5 (see Image 22) to what will become the start of Center Back. I have folded the tape over the edges and around to the other side to help hold it together (see Image 23) ... you can also put tape on the back wherever you feel it twists a bit or you're worried it might come apart because of the quality of you tape.
Repeat with the other side and you should have three sections that look like Image 24.
Step Three
Cut out the left and right sides of Pattern Pieces 11 through 13 ... I’ve also included the left and right sides of Pattern Pieces 21 and 22 because it was an efficient use of A4 printer paper (see Image 25).
Start by joining Pattern Piece 11 to Pattern Piece 12. I use little pieces of tacking tape as usual to hold things together as I gently ease my way around lining up the arrows (see Images 26 and 27). Repeat with Pattern Piece 13. Next join Pattern Piece 21 to Pattern Piece 22 using the arrows as guides.
Next join Pattern Section 21/22 to Pattern Section 11/12/13… tacking with little bits of tape will help (see Images 28 and 29) … be gentle and ease it into place, then finishing with longer tape.


Image 25
Image 26
Image 27
Image 28
Image 29
It should look as below in Image 30. You can check to see how well you’ve taped by looking for gaps on the back. Repeat for the other side and you should have two pieces that look like Image 31.


Image 30
Image 31
Image 32

Image 33
Next we join Pattern Pieces 14 and 15 to the Pattern Piece 6 (see Image 32). This piece also has a strong curve so go slowly and follow the arrows ... using little pieces of tacking tape is useful. It should look like Image 33 when complete ... repeat for the other side. Once joined you’ll start to see how the underside of the cheek will work out by wrapping the leg a little.
I then joined the top section of the butt checks to the bottom section at Pattern Pieces 10 and 11 as shown in images 34 and 35, to create the whole butt cheek and inside leg.


Image 34
Image 35
Step Four
The rest of the front leg is reasonably easy. You just have to be careful to make sure all the arrows line up ... that part is critical or there'll be unexpected curves popping up ... if things don't line up it's typically because you haven't cut exactly down the center of the line. Cut out Pattern Pieces 16 through 20 (see Image 36).
Start by joining Pattern Pieces 16 and 17 together (see Image 37) in the middle and working outwards ... it’ll be much easier to handle than if you work from one side to the other, and more likely to line up ... note that it sticks out to one side. Next join Pattern Piece 18 to the edge of Piece 17 (see Image 38). Pattern Pieces 19 and 20 go around the outside starting at Piece 16 (see Image 39).


Image 36
Image 37
Image 38
Image 39
Start by joining Pattern Piece 19 to Piece 16, making sure it's all the way neatly into the square corner ... Pattern Piece 19 has a strong inside curve so I recommend tacking that in place gently all the way around with little pieces of tape at the arrows. Finish by taping it firmly both inside and out (see Image 40 ... sorry I don't have more photos of this part).
Next we apply Pattern Piece 20 by starting square in the corner again (see Image 41) like we did for the previous piece and tacking all the way along lining everything up with the arrows. Then tape with longer pieces to secure everything in place (see Image 42). I put some tape on the back of this join to help secure it.
Repeat for the other side (see Image 43). When finished we should have all the pieces of the butt section ready to put together (see Image 44).


Image 40
Image 41
Image 42
Image 43
Image 44
Step Five
Now comes the totally fun part and incredibly difficult part at the same time. Putting these sections together looks daunting, but if you go slowly step by step it’s fairly straight forward. We’re also going to tape from the inside instead this time as it’s much easier to get the tape to hold, only you have to keep checking the other side to make sure the arrows line up. As usual we start from the bottom and inside and work our way out.
So the first place we tack is by joining Pattern Piece 5 (the narrow rectangular one) to the crotch, Pattern Piece 4. The pointy end of the crotch goes toward Pattern Piece 10 and the angle on the side of Pattern Piece 4 goes to the join between Pattern Piece 6 and 14. Look at the Image 45 and note the pointy end of the crotch and the angle meeting where the two pieces join. See I’ve tacked it in place.


Image 45
Image 46
Image 47
Image 48
Image 49
Image 50
Next start to line up the front crotch going up to the tummy … they line up really well (see Image 47). If you can get a second pair of hands to tack the join as you hold it in place it’s much easier but I did this by myself. Once tacked, check the alignment marks line up on the outside and if so then tape completely on the inside. Repeat with the other side ... it's easier to see where the corner in the crotch section goes once one piece is already on (see Image 48) ... I tack everything into place first before fully taping (see Image 49).
Now you can tack the Center Back between the cheeks on the inside all the way up to the top of Pattern Piece 21 (see image 50) ... now you can really start to see how all this goes together and the shape it creates ... it's really exciting and rewarding at the same time when you see it holding its own shape .... in nothing more than card and tape!


Image 51
Image 52
Image 53
The last bit remaining is to tape up section 14/15 of the leg to the front crotch and lower tummy section (see Image 51). This is really straight forward if you tape from behind. You should end up with something that looks exactly like Images 52 and 53.


Image 54
Image 55
Image 56
I start at the lower front by lining up Pattern Piece 16 with Pattern Piece 15, by beginning at the corner as before (position shown in Image 54). I apply tacking pieces of tape to Piece 16 first (see Images 55 and 56) as I found it easier to hold, but that depends on whether you have an extra set of hands … I didn’t at the time. Work your way from the corner down, not the other way.
Next work your way up Pattern Piece 3 lining up each part of the front leg section with the arrows all the way to the end of Pattern Piece 3 … I switched taping from the inside to the outside about half way because it was easier to hold. Repeat for the other side.


Image 57
Image 58
Image 59
This leaves us with essentially just the side seams (see image 57). I start at the corner again (see Image 58) and work my way down the leg slowly ... I did tack it a little first before using longer tape, but that's up to you. Watch the arrows carefully. Lastly join up the waist section between Pieces 3 and 22 ... I put extra tape on the back of this join because it likes to crease. You should end up with a model that looks like Image 59.


Image 60
Image 61
Image 62
Last but not least, in order to fix everything in place and hold the shape properly we need to add the leg bases. I start by applying lots and lots of tacking tape around the circumference of the leg base (see Image 60). I then join it first at the inside leg as that's the hardest part to get right if it doesn't line up afterwards (see Image 61), and using the arrows, slowly work my way around until it's all joined up. fill in the gaps with more tape to complete the leg base (see Image 62) and repeat for the other side.
That's it ... you've now completed the bottom half (see Images 63 to 65). Go have a coffee, walk the dog, play with the kids or get something to eat .... maybe all four ... just have a break to refocus!


Image 63
Image 64
Image 65
Step Six
We build top half right on to the bottom half, sometimes in pieces, sometimes in sections but starting at the bottom and back and working our way up, just like we did for the bottom half of the dress form.
Cut out all the pieces, left and right, for Pattern Pieces 24, 25 and 27 (see Image 66). They're all cut in half such that they fit on printer paper, so you'll need to stick them together first. Pattern Piece 24 is the hollow down the center of the back. It's not important for a body form, but it does add stiffness to the model so I'm using it ... later if you don't like it you can fill it in with papier mache, but for now it's essential to holding everything upright. Tape the left and right sides of Pattern Piece 24 together (see Image 67) ... I put a few pieces of tape on the back just to help hold it as this piece is concave with some pretty serious curvature once finished.


Image 66
Image 67
Image 68
Image 69
Image 70
Next we apply Pattern Piece 25 to the outside of Piece 24. This one looks like it doesn't line up properly but it does ... just start at the heavy black line (see Image 68) and work your way down (see Image 69) using tacking tape to hold it in place first and use the arrows to line everything up ... continue to the top of the join. Repeat for the other side (see image 70), joining both 25's together at the little tab ... you might find this a little long at the top or a little short depending on how well you cut. If it's long you can trim it up to 0.5mm each side. If its short up to 0.5mm each side then just just tape it with a square gap ... don't close it or you'll get a point. Anymore than 0.5mm either way and remove the piece, check your cutting and start again.


Image 71
Image 72
Image 73
Pattern Piece 27 is long and curves back on itself a couple of times so apply tacking tape along the full length before you apply it (see Images 71 and 72). Starting at the heavy black line (bust line btw), work your way tacking up and down following the arrows. Once in place, use longer tape to complete the join. Repeat for the other side (see Image 73).


Image 74
Image 75
Image 76
Pattern Piece 23 is the section under the rib cage. It fits into the square at the bottom of Pieces 25 and 27 (see Image 74). Starting at the square, join the edge of Piece 23 to Piece 25 first, taping securely on both sides ... this piece takes a lot of weight and twist. Complete the join to Piece 27 (see Image 75), taping a little on the inside as well to help hold it in place. Repeat for the other side. You should now have something that looks like Image 76. Do not tape at the center front as yet.


Image 77
Image 78
Image 79
Image 80
Now for the tricky part ... a second pair of hands helps to hold the section in the air while you join it to the butt, although I was able to do it by myself with a bit of effort ... I do recommend finding help if you can. Using tacking tape, fix the bottom of Piece 25 to Pieces 21 and 22 on both sides ... this can be really tricky as it'll seem like the angles are all wrong ... you'll need to push the lower back in or out to change their angle until you find the sweet spot, but it's there I assure you (see Image 77). Use a bit of tape on the inside to secure this section (see Image 78) or it will pop off as you try to continue to join around to the front. Once you've got to the side seam area it becomes very straight forward, so start with the tricky bit. Do not join the base of the spine hollow until it's joined all the way around or you won't be able to twist it to the right position to get the join to line up.
Continue along with Piece 23, working around tacking across the tops of Pieces 1 through 3 (see Image 79). You may find Piece 23 to be a fraction long or short depending on how accurately you cut pieces 1 through 3. If its short I'll bet you can still see most of the black lines around the tummy pattern pieces! This is why accurate cutting is critical. If it's short by up to 1mm either side, leave the gap and just join both sides with a square gap up the middle ... don't close it to a point at the top, leave the gap. If it's long by up to 0.5mm you can trim it. Any more than that and you need to work out why it's too long as the following pieces won't fit.
Lastly you will now be able to tape the bottom of the spinal hollow into place by pushing it in or out until you find the sweet spot again. Depending on how well you cut the center back curve between the left and right Pieces 24, the tip may tilt in or out too far ... you may trim it to fit ever so slightly. It should look like Image 80 when complete.
Step Seven
Pattern Piece 28 is made up of three separate pieces (see Image 81) to get them to fit on standard printer paper, so first you need to tape all the pieces together firmly on both sides (see Image 82) .... make sure you assemble this as shown in the photo ... there is a "Join to Self" at the shoulder seam that doesn't get joined yet! This is a long curve, so make sure it's perfectly cut or you might find it's a bit long or short when you get to the end. I started by applying tacking tape along the full outside curve (see Image 83). Start to apply Piece 28 by starting at the heavy black bust line and tacking your way along to each end. This piece should be fairly easy to get on if you go slowly around, angling Piece 28 a little here and there to get the join to line up. Pay very close attention to the arrows.
Repeat for the other side. It should look like images 84 and 85 when complete.


Image 81
Image 82
Image 83
Image 84
Image 85
The next section is the breast plate (for want of a better expression). Pattern Pieces 30, 31 and 32, left and right, are shown in Image 86. In this part of the demonstration I'm using an older pattern which shows just one breast outline ... in the copy you have there will be more (you'll see the new one in the section on making the breasts). Do not cut out the breast line of your choice until the complete body form is finished .... the breasts are the last piece you insert before capping the neck and we need to wait to cut out that line. Your pattern pieces are still exactly the same shape ... if you don't cut out the breast hole you'll have a flat chested body form.


Image 86
Image 87
Image 88
Image 89
Join the left and right sides of Pattern Piece 32 together along the center front (see Image 87) ... add Pieces 31 to either side (see Image 88) and finally add Pieces 30 to either side again (see Image 89) ... these are all very easy slight curves to join. If you cut the breast pieces out well then the top yoke will fit just fine (see Image 90) ... try it out first as you might find there is a tiny gap or overlap at the center front as we've seen before .... again 0.5 mm either way can be trimmed or filled with tape, but anymore and you'll need to find out where your cutting is out and fix that before proceeding.
Join pattern pieces 29 together at center front, using the spacing/modification you determined earlier if necessary, and apply tacking tape all the way along the lower edge being careful not to cover the arrows (see Image 91). Join the yoke to the breast plate by lining up the arrows (see Image 92). You now have the last of the main body sections ready to be fitted (see Image 93).


Image 90
Image 91
Image 92
Image 93
Apply tacking tape to the bottom of the breast plate (see Image 94) and gently join it up with all the corners and arrows in the body section (see Image 95). I recommend applying tape to the inside of this join as well, as you'll be cutting out breast holes later ... probably with a cutting blade.
Apply tacking tape to the edge of Pattern Piece 28 where it will join to the breast plate (see Image 96) and gently follow the curve from the bottom to the top, lining up the arrows as you go (see Image 97) ... complete with longer tape (see Image 98). Your body form should now look the same as Image 99.


Image 94
Image 95
Image 96
Image 97
Image 98
Image 99
Step Eight
The neck section is comprised of Pattern Pieces 26, 33 and 34 (see Image 100). These need to be very carefully cut out as even the slightest error can cause them to either not fit or end up wonky. Start by joining Pattern Piece 33 left and right together at the center front and Pattern Pieces 26 left and right together at center back (see Image 101) ... I recommend taping these from behind to help stop them folding.
Apply tacking tape to the lower edge of the nape section (see Image 102) ... and carefully join it to the top of pieces 25, starting at the center back and working your way outwards as shown in Image 103. I recommend using tape on the inside of this piece before taping completely on top (see Image 104).


Image 100
Image 101
Image 102
Image 103
Image 104
Apply tacking tape to the lower edge of the front lower collar section (see Image 105) ... and carefully join it to the top of yoke, starting at the center front and work your way outwards on both sides (see Image 106) .... again I recommend using tape on the inside of this piece before taping completely on top (see Image 107). Lastly you can now close out the join between Pattern Pieces 26 and 33 (see Image 108).


Image 105
Image 106
Image 107
Image 108
Pattern Piece 34 is the front and back collar in one .... there are left and right sides (see Image 109). Join these at the center front and apply tacking tape along the full length of the inside lower edge (see Image 110) ... note I said inside, not outside ... this is because the tacking tape will hold better when applied from inside the neck, making positioning much easier. Starting at center front again, join the collar to the Piece 33 from the inside, working your way to the back bit by bit on both sides until the collar meets at center back (see Image 111) ... tape the center back closed on both sides. Lastly tape all the way around on the outside to secure the collar in place (see Images 112 and 113).


Image 109
Image 110
Image 111
Image 112
Image 113
The shoulder caps are designed differently to most body forms. They are rather vertical allowing for clothing to be slipped on and off more easily without using collapsible shoulders. They also have a curve at the bottom to help with stiffening the frame and the cap itself ... while it might look a little different to what you're used to, you'll find it more practical to work with.
As usual start by applying tacking tape all the way around the circumference of the shoulder cap. Start by joining it to one of the arrows on the front chest and then to one on the back ... then work your way around until it's tacked along the whole circumference (see Image 114). Next complete the join by taping over the every part of the edge (see Image 115). I recommend adding tape to the inside via the neck hole to help stiffen it up.
As much as it might seem more practical to wait to place the shoulder cap until after the breast form is in place, you'll find it much harder to put the cap on last as the breast can twist the form. If you've made Miyumi a few times and know how to counter the twist then by all means change the steps around, I just don't recommend it for the first time.


Image 114
Image 115
Step Nine
Miyumi has a 76cm under bust measurement. I made her to be the exact global average of under bust measurements from over 20,000 data sets I have. She represents the absolute average of every size I have collected over 20 years. Now bra wires work on a range (fit envelope) based on under bust and bust. When selecting a bra wire you choose the under bust measurement closest to your own and then select the difference between bust and under bust to be the cup size. To make it easier, just know that Miyumi is 76cm at the under bust and then choose which cup size you want. The number in the table represents the wire size you would choose to cut out from the pattern. See the table below ...
As I chose Miyumi based on the average of everything, I'm also going to make her a full C cup ... so I'm going to chose the 36 Wire size. Now each wire size comes in three different profiles:
-
Low Profile: flatter bust but same wire circumference (suits dance)
-
Medium Profile: average full cup
-
High Profile: designed based on the fullness of an implant
I'm going to chose the medium profile for the sake of these instructions, but they all assemble exactly the same.


Image 114
Image 115
Look for the breast patterns you want in the PDF pattern and print just the left and right patterns for the profile and wire size you've chosen. Each breast is on one full page, one page for left and one page for right, all grouped and labelled such that you only have to print the two pages you want. Cut out your pattern (see Images 114 and 115) extremely carefully ... excess line can make the breast too large to go into the hole in the chest (if that happens I'll show you how to fix it later but it's better to be careful now).


Image 116
Image 117
Image 118
Image 119
Image 120
Image 121
Each Pattern Piece has an arrow on either side in the exact middle of the curve ... use this to line up your pattern pieces. I apply a little tacking tape either side of the arrow so I can still see the arrow (see Image 116) and start by joining the two pieces together in the center (see Image 117) ... gradually working my way to either end by curving the card as I go (see Image 118). You need to be extremely careful about assembling these with no gaps at all or the shape might change and possibly the breast won't fit the hole. Repeat for the next piece (see Image 119) and the next piece (see Image 120) in order ... I started with Pattern Piece A but you really can start with whichever one you like, just do so in order. After about halfway you should see the profile developing (see Image 121) although it will look a bit odd as it'll want to curve up tighter ... that's quite normal.


Image 122
Image 123
Image 124
Image 125
Image 126
It will actually look like the last piece or two won't fit in because it curves up so much into itself (see Image 122), but it will go in. Image 123 shows all the pieces in without the last join taped up. Again this one it's important to line up exactly at the arrows (see Image 124) or it'll get a weird spiral kink in it. Finish off the line and put a little tape on the apex and you're done (see Image 125). Repeat for the other side and you'll have two breasts ready to put into the chest (see Image 126).
Step Ten
Now comes another tricky part. Depending on how well you cut and taped the breast forms, they may be either a little too small or large to properly fit the hole. Images 127 and 128 show the updated chest plate labeling with all four wire sizes. On the side of the holes you'll see a line marked "Join between Bra Piece D and E". This is your locator mark. Before you cut any holes, line your breast form up here so the join between Pattern Pieces D and E is on that line and tape it into place (see Image 129) ... check if it fits the rest of the hole marking or not by tacking it into place gently (see Image 130). If it's a little large or small you can draw around where it doesn't fit perfectly to create a cutting new line ... Indeed if you really want you can move the entire breast up or down or in or out to the position you want ... it doesn't have to be in the standard position offered ... this is just a guide. Luckily this time, mine fit perfectly (only a few times out of 20 that it didn't need some adjustment!).


Image 127
Image 128
Image 129
Image 130
Once you've determined your cutting line you need to cut it out. Remember when I said we leave this stage until last? That's because the shape of the chest will change once the sleeve caps are put in which determines the out line of your cut out hole ... even more so if you wish to change the breast's position on the chest! So ... to cut it out ... this is going to hurt your feelings as you've probably put a fair amount of emotion into making this just perfect so far but it's the next step.
Using a sharp cutting blade, gently cut an X shape into the middle of the hole so you can get your scissors in (see Image 131) ... I found this easier and less likely to indent the model than just stabbing her through the heart with blunt scissors ...which also felt weird. Cut from your X out to the line and cut out the hole (see Image 133).
Apply a little tacking tape to the inside of the locating line between Pattern Pieces D and E and tack the breast into place (see Images 134 and 135) ... if you've chosen a different hole position then make sure you have a locating point that's the same on both sides. Once it's located they're really easy to tack into place, by holding through the other breast hole the first time, and the neck hole for the second breast. Once tacked, apply longer tape to secure the breast into position (see Image 137). Repeat for the other side. That's it .... only the neck cap to go!


Image 131
Image 133
Image 134
Image 135
Image 136
Image 137
Step Eleven
The final piece we need to add is the neck cap. Apply tacking tape all the way around the circumference of the cap (see Image 138). Start by joining the cap to the neck at the shoulder line (see Image 139) ... repeat on the other side to hold the cap in place. Slowly work your way around making sure the cap is right on the edge of the neck ... once it's on, add more tape to secure it firmly in place (see Image 140).
Note: I hadn't yet added the breast forms to this body form when I took the photos, but you'd apply the breasts before adding the final cap obviously!


Image 138
Image 139
Image 140
And now you have a complete Miyumi body form, ready for the next stage of cutting at the waist and applying papier mache!

